vue 汇总
更新视图原理
- 数据劫持
- vue中的数据双向绑定 一个是对象 一个是数组
- 对象要求数据先存在,否则无法更新视图
- 数组方法都是 vue内容进行重写了 但是length长度的变化和通过索引是无法更新的
- 数据变化后更新视图操作是异步执行的 调取vm.$el.innerHTML 值是没有变化的
- 可以通过vm.$nextTick 等视图更新后 获取的就是变化的值
- 以下修改 不会更新视图
- vm.info.address = '1234' //原data下没有这个属性
- vm.arr.length-- //数组长度变化
- 以下修改 都会更新视图
- vm.info = {address:'123'} //赋值对象会 会被监控 可参考Observer.js
- vm.arr.push(1) // 数组方法的增减
- 在原有的对象内 新增数据
- vm.$set(vm.info,'address','22222')
let obj = {
    age:'12',
    data:{
        name:'3333333'
    }
}
function observer(obj){
    if(typeof obj === 'object'){
        for(let key in obj){
            defineReactive(obj,key,obj[key])
        }
    }
}
function defineReactive(obj,key,value){
    // 如果value 是一个对象  则递归
    observer(value)
    Object.defineProperty(obj,key,{
        get(){
            console.log('get')
            return value
        },
        set(item){
            // 如果传入的值 是一个对象,也要拦截下
            observer(item)
            console.log('1数据更新了',item)
            value = item
        }
    })
}
observer(obj)
- 1、如果 后增加的属性 是不会触发setter访问器的, 同样vue后增加的属性 也不会刷新视图 obj.data.s = 'sssssss' //不会出发数据更新
- 2、对象情况下
- 修改obj 下面的属性 就会触发 数据更新了 因为传入的是一个对象 {s:"123"} 也会被监控
  obj.data= {
      s:"123"
  }
- 3、数组情况下
- defineProperty 只针对对象有用 数组无效, 这种情况下改写所有的数组, 以push为例
  obj.arr = [1,2,3,4]
  let arr = ['push','pop','shift','unshfit'] //dengdeng
  for (let i=0;i<arr.length;i++){
      let method = arr[i]
      let oldPush = Array.prototype[method]
      Array.prototype[method] = function(item){
          console.log('2数据更新了');
          oldPush.call(this,item)
      }
  }
  obj.arr[1] = '123'
  obj.arr.push(5) //如不改写,不会触发数据更新
vue实例上的方法
- vm.$el
- vm.$mount() 做单元测试
- 如果实例化没有收到el项目,可以使用 vm.$mount(elementOrSelector) 手动地挂载一个未挂载的实例。
- 如果没有提供elementOrSelector参数,模板将被渲染为文档之外的的元素(内存当中),必须使用原生 DOM API 把它插入文档中。
- vm.$options vue内的属性选项
- vm.$nextTick(()=>{})
- vm.$watch('data1',(newValue,oldValue)=>{})
指令
- v-show 控制的是样式 不支持template v-if 控制的是dom 支持template
- v-for 放在谁身上就循环谁(可以循环对象也可以数组) 里面key值作用
- 为啥data里面不能放方法(function) 因为里面的this 是window而不是vue实例
  //:key解析
  <div v-if="flag">
    <span>测试1</span>
    <input type="text" :key='1' />
  </div>
  <div v-else>
    <span>测试2</span>
    <input type="text" :key='2' />
  </div>

  //如果不加key 那么flag 值变化的时候 input不会更新
  //加key 在diff 比较的时候 以便区别,用来区分元素
  //一般不用index作为key

  // 如果fn不传值 方法里面默认参数就是e, 如果传值 fn($event,a) $event也是e 固定写法 a就是别的参数
  <input type="text" @input="fn" class="ss">
- 定义指令
- Vue.directive有2中写法 第二个参数是对象 和 函数
- 对象里的钩子
- bind:只调用一次,指令第一次绑定到元素时调用。在这里可以进行一次性的初始化设置
- inserted:被绑定元素插入父节点时调用 (仅保证父节点存在,但不一定已被插入文档中)
- update:所在组件的 VNode 更新时调用,但是可能发生在其子 VNode 更新之前
- componentUpdated:指令所在组件的 VNode 及其子 VNode 全部更新后调用
- unbind:只调用一次,指令与元素解绑时调用。
- 钩子函数参数
- el:指令所绑定的元素,可以用来直接操作 DOM
- binding:一个对象,包含以下属性
- name:指令名,不包括 v- 前缀
- oldValue:指令绑定的前一个值,仅在 update 和 componentUpdated 钩子中可用。无论值是否改变都可用
- expression:字符串形式的指令表达式。例如 v-my-directive="1 + 1" 中,表达式为 "1 + 1"
- arg:传给指令的参数,可选。例如 v-my-directive:foo 中,参数为 "foo"
- modifiers:一个包含修饰符的对象。例如:v-my-directive.foo.bar 中,修饰符对象为 { foo: true, bar: true }
- vnode:Vue 编译生成的虚拟节点。移步 VNode API 来了解更多详情
- oldVnode:上一个虚拟节点,仅在 update 和 componentUpdated 钩子中可用
  //输入的数值 只要3个
  <input type="text" v-model='msg' v-split.xx='msg' />
    Vue.directive('split',function(el,bindings,vnode){
      let ctx = vnode.context;//获取上下文
      ctx[bindings.expression] = el.value.slice(0,3)
    }
  })

  <input type="text"  v-split.xx='msg' />
  //下面增加了v-model='msg'
  Vue.directive('split',{
    bind(el,bindings,vnode){
      //el 当前dom bindings申明指令的参数 vnode.context上下文
      let ctx = vnode.context;
      el.addEventListener('input',(e)=>{
        let val = e.target.value.slice(0,3);//输入框中的内容
        ctx[bindings.expression] = val //将输入的值复制给当前的msg
        el.value = val
      })
      el.value = ctx[bindings.expression].slice(0,3)
    }
  })

  // 获取焦点
  Vue.directive('focus',{
    bind(el){
      Vue.nextTick(()=>{
        el.focus();
      })
    }
  })
select/radio/checkbox
  // select  v-model绑定option中的value   option标签中间的显示的给客户看 value给程序员看
  <select v-model='selectValue'>
    <!-- 默认 请选择 -->
    <option value="0" disabled>请选择</option>
    <option v-for='list in lists' :value="list.id">{{list.value}}</option>
  </select>

  //radio 当前的radioValue== 男 那么就会自动选中
  男:<input type="radio" v-model="radioValue" value="男">
  女:<input type="radio"  v-model="radioValue" value="女">
  {{radioValue}}

  //checkbox checkboxValues初始值为数组  当不给value的时候 默认值 false/true 给了value才是他的值
  游泳: <input type="checkbox" v-model="checkboxValues" value="游泳">
  健身: <input type="checkbox" v-model="checkboxValues" value="健身">
  {{checkboxValues}}
修饰符
- v-model.lazy 转为在 change 事件_之后_进行同步
- v-model.number 将用户的输入值转为数值类型
- v-model.trim 自动过滤用户输入的首尾空白字符
- @keyup.enter
- 键盘修饰符 @keyup='fn' input按下键盘就触发fn .enter修饰符就是(按下enter键的时候触发)
<!-- 在“change”时而非“input”时更新 -->
<input v-model.lazy="msg">
过滤器
{{name | capitalize(1)}}
Vue.filter('capitalize',(value,val)=>{
    console.log('canshu',value,val)
    return value
})
属性绑定-class
// class 绑定 对象时 isRed为ture class才为red 数组时 可以显示多个
<div :class="{ red: isRed }"></div>
<div :class="[classA, classB]"></div>
<div :class="[classA, { classB: isB, classC: isC }]">
computed&&watch&&methods
- methods 只要方法放在页面上 页面上任何数据变化 该方法都会执行一次 没有缓存
- computed 和 watch 区别 computed不支持异步 watch可以
- computed 可以缓存
- watch
- 可以写成对象也可以写成方法
- 写成对象主要是传递参数 immediate/deep
 watch:{
  //全写
  firstMsg:{
      handler(){
          console.log('firstMsg 变化了')
      },
      immediate:true,//绑定的时候 立即执行(默认不会)
  },
  //简写
  lastMsg(){
      console.log('lastMsg 变化了')
  }
  },
- computed
- 可以写成对象也可以写成方法
- 一般默认都是调用的get方法
- 写全就是set和get方法都有(一般做双向绑定才用到,全选等功能)
//全选 用computed做
<input type="checkbox" v-model='checkAll'>
<input type="checkbox" v-for='(check,index) in checks' :key='index' v-model='check.value' >
computed:{
// Object.defineProperty来实现

// 全写 computed的set方法在 checkbox 能用到
// 当checkbox 被点击的时候 触发set()
checkAll:{
    get (){
        return this.checks.every(item => item.value)
    },
    set(val){
        this.checks.forEach(item =>{ item.value = val });
    }
}
},
render
- 渲染渲染
- 默认main文件中只支持render方法
- template和 render 同时存在的时候 以render数据为准
- 脚手架中要用template 要添加一个vue.config.js
module.exports = {
  runtimeCompiler:true
}
- render
// 多个的话 后面接数组
render:h=>h('h1',{
  class:{a:1},
  style:{color:'red'},
  on:{click(){alret(1)}},
  attrs:{a:1}
},'word')
// 也可以直接接收一个组件或对象 是组件他会将组件解析成对象 App是一个组件
render:h=>h(App)
//  jsx语法 内部自动调用h 名字还只能传递h 尽量不要写箭头函数
render:function(h){
  console.log(h)
  // say方法要提前写好
  return <h1
    on-click={()=>this.say()}
    class = 'a'
    style={{color:'red'}}
    >点我啊</h1>
}
- rander组件
export default  {
    functional: true, // 函数式组件 只有render方法不能写template , 设置了他 context才能获取到上下文
    render(h,context){
      // 获取组件内的值  context.slots().default
      console.log(context.slots().default)
      // 获取传递过来的属性 context.props
      return <div>{context.slots().default}</div>
    }
}
lifeCycle
  beforeCreate(){
      //初始化自己的生命周期 获取children 和 parent,并且绑定自己的事件
      //不能操作属性和方法
      console.log(this,this.$data)
  },
  created(){
    // 可以获取数据和调用方法
    // 没有this.$el 不能获取真实dom
      console.log(this.$data,this.data)
  },
  beforeMount(){
      //第一次调用 函数渲染之前
      //会检测template数据,有的话会把template渲染成一个 render函数
      console.log('挂载前')
  },
  // template和 render 同时存在的时候 以render数据为准
  //template会调用render函数 render里面创建一个虚拟dom  最后将虚拟dom渲染成真实的dom
  render(createElement){
    // createElement就是一个虚拟dom
    return createElement('div',{
      attr:{
        id:123
        },
      on:{
        click(){
          console.log('111')
        }
      }
      },'hello')
  }
  mounted(){
      //获取真是的dom this.$el
      console.log('挂载后')
  },
  beforeUpdate(){
      console.log('更新前')
  },
  updated(){//一般不要操作数据 可能会导致死循环
      console.log('更新后')
  },
  beforeDestroy(){
      //当前实例还可以用,这儿一般清除定时器
      // 移除绑定的方法事件
      console.log('销毁前')
  },
  destroyed(){
      // 实例上的方法 监听都被移除掉
      console.log('销毁后')
  },
  //触发 销毁 第一种路由切换 第二种 vm.$destroy()
  // 销毁 只是针对响应式的数据 绑定的方法事件
components
- 组件类型
- 全局组件
- 局部组件
- 函数式组件
- 异步组件
- 子组件data必须是函数类型,保证数据不会互相影响,通过一个函数返回唯一的对象
// 全局组件 在任何组件中可以直接使用 而且不需要引入
//
Vue.component('my-button',{
  data(){
    return{

    }
  }
  template:`<button>点击</button>`
})
let vm = new Vue({el:'#app'})
// 不能写但标签  有bug 而且不符合w3c规范
<div>
  <my-button></my-button>
</div>
- 通信
- 1、props和$emit
- 2、$attrs和$listeners
- $attrs子组件没用的属性(props没用接收的)
- 他可以批量传递属性
- 3、$parent和$children
- 4、$refs获取实例
- 5、父组件中通过provide来提供变量,用Inject接受
- provide和Inject 和 react的上下文 差不多
- 组件的数据流 父组件 将数据传递子组件,子组件不能直接更改数据
- 6、envetBus平级组件数据传递
- 一个全局的发布订阅方式
- 适合比较简单的数据流
- this.emit/this.on (通过全局的vue)
- 7、vuex状态管理
- 属性传递
- msg属性取出来的值 都是String 加: 引号里面是啥就传啥类型 不加:一律按String处理
<my-button :msg='123' :a='3' :arr="[1]"></my-button>
- 子组件 this.$attrs 获取所有的父组件传递的属性
- $attrs子组件没用的属性(props没用接收的)
- v-bind=$attrs 绑定所有的属性
<button v-bind='$attrs' @click="btn">触发1</button> - props接收的参数会挂载到当前组件的实例上
- 父级给子集传递参数的时候 会显示在dom上 可以加inheritAttrs:false 隐藏掉
- 如果接收的属性是对象或者数组 那么必须要用一个函数返回这个对象
  props:{
    msg:{
        type:Number,
        default:123
    },
    arr:{
        type:Array,
        // 数组或者对象 必须写成函数返回的形式
        default:()=>([1,3])
    },
    a:{
        type:Number,
        validator(val){
            //属性校验器,val就是传递过来的值
            //true说明正常 false说明传值不满足
            return true
        }
    }
  },
- 方法传递
- 给组件绑定事件 需要加.native 不加就认为是一个普通的属性, 他会绑定给子组件最外层标签
- $listeners 获取父组件传递所有的方法
- v-on=$listeners 绑定所有的方法
  <!-- 父组件 @click='btn' => this.$on('click',btn)-->
  <btn-button a='123' b='sss' @click='btn'></btn-button>
  <!-- 子组件 -->
  <button v-bind='$attrs'>v-bind将父级所有的属性绑定到当前</button>
  <button @click="$emit('click')">emit触发click方法</button>
  <button @click="$listeners.click">触发父级click的方法</button>
  <button v-on="$listeners">v-on将父级所有的方法绑定到当前</button>
组件通信
- _uid:每个组件都有唯一的id
- 平级通信
//子组件 methods
change(){
  this.$parent.cut(this._uid)
}
//父组件 methods
cut(id){
  this.$children.forEach(child => {
    if(child._uid == id){
      //  可以确定是哪一个子组件
      //  对child做处理
    }
  })
}
- provide通信
- provide 在上游 提供 inject下游接受 多少层都可以获取到
  //和data 同级
  // 申明
  provide:{
      m1:'根组件提供'
  },
  // 获取
  inject:['m1']
- ref
- 如果给dom 就是一个dom
- 如果给v-for 出来的就是 数组
- 如果给组件 出来的就是组件的实例
  // 声明
  <div ref="my">dom</div>
  //获取
  this.$refs.my // 当前dom

  // 循环
  <div v-for='item in 3'>
      <div ref='my'>12</div>
  </div>
  this.$refs.my //[div, div, div]

  //组件上添加ref
  <Item ref="my"></Item>
  this.$refs.my //就是当前组件的实例 可以调取里面的方法
- 父子组件通信
- this.$emit 发射
- this.$on 监视
<!-- 父组件 -->
  <div>
  <!-- @updata1 ==> this.$on('updata1',btn1) -->
    <!-- 第一中写法 -->
    <B :s='123' @update='btn1'>
    {{inp}}
    <!-- 第二种写法  将btn1里面的事件 直接写上来 -->
    <B :s='123' @update='value => inp = value'>
    <!-- 第三种  语法糖 -->
    <B :s='123' @update='value => inp = value'>

  </div>
  <script>
    methods:{
      btn1(value){
        console.log('value',value)
        this.inp = value
      }
    }
  </script>

<!-- 子组件 -->
  <div>
    <button @click="btn">子传父</button>
  </div>
  <script>
    props:['s'],
    methods:{
      btn(){
        this.$emit('update','dat1')
      }
    },
  </script>
- 父组组件双向绑定
- 接收的s和eimt发射的s名字要一样
- 父组件在传递一个s.sync修饰符过来
- title1值和s的是就绑定了
<!-- 子组件 -->
<div>
  <button @click="btn">子传父</button>
  {{s}}
</div>
<script>
 props:['s'],
  methods:{
      btn(){
        // update固定写法:后面的s随意更改
        this.$emit('update:s','dat1')
      }
    }
</script>

<!-- 父组件 -->
<div>
  <B :s.sync='title1'></B>
  {{title1}}
</div>
<script>
  data(){
      return {
        title1:'ti',
        inp:123,
        isShow : true
      }
  }
</script>
- v-model 响应式传值
<!-- 父 -->
  <B v-model='s'></B>
  {{s}}
<script>
  data(){
      return {
        s:'123',
      }
  },
</script>

<!-- 子 -->
  <button @click="btn">子传父</button>
  {{s}}
<script>
 props:['s'],
  methods:{
    btn(){
      this.$emit('input','dat1')
    }
  },
</script>
动画
- 常见触发动画的操作 v-if v-show v-for 路由切换
- css 添加动画 animation transition
- js添加动画 自带钩子 动画库 velocity
- 动画分为 单个动画 多个动画
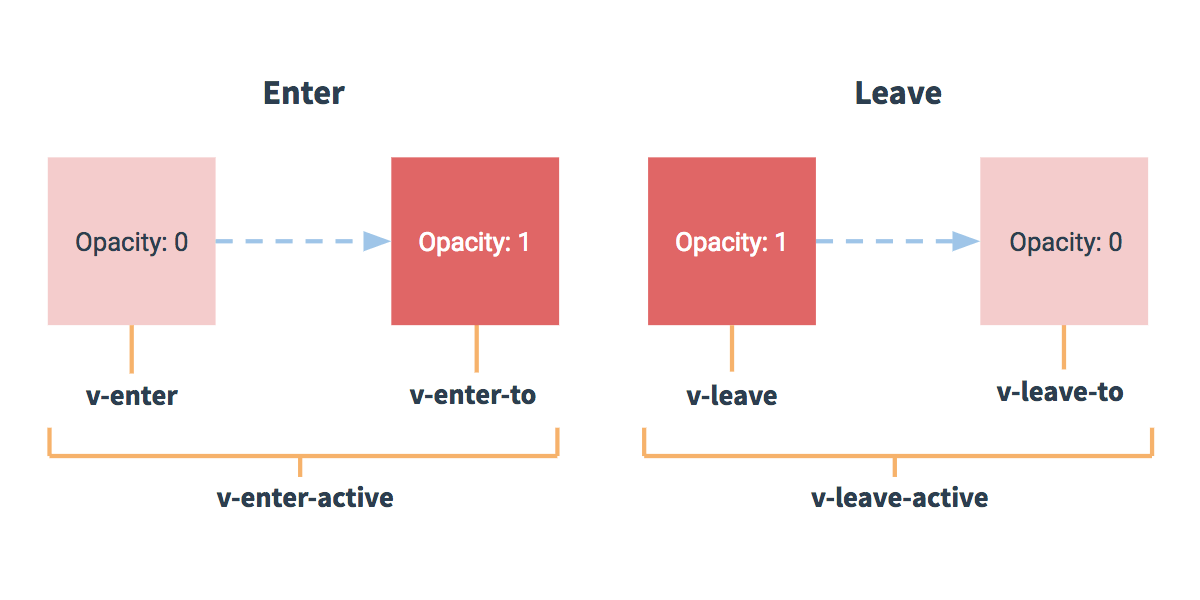
- 动画默认从当前状态 变化 所有 v-enter-to和v-leave 一般用不到
vue动画 用的transition组件 多个的时候 可以给他取名字
<style>
.show{
  border: 1px solid red;
  background: red;
  width: 100px;
  height: 100px;
}
.v-enter {
  opacity: 0;
}
.v-enter-active,.v-leave-active{
  transition: opacity 2s linear
}
.v-leave-to {
  opacity: 0;
}
</style>

<div @click="btn">点击</div>
<transition>
    <div class="show" v-show="isShow">
    </div>
</transition>

<script>
  data(){
      return {
        isShow : true
      }
    },
  methods:{
    btn(){
      this.isShow = !this.isShow
    }
  }
</script>
第三方动画库
- yarn add animate.css
- 用法
- 第一步 在需要动画的标签内 添加animated类
- 第二步 .v-enter-active 设置 animation: bounceIn 1s ease-in (bounceIn效果看官网)
- 第三步 .v-leave-active 设置 animation: bounceOut 1s ease-in (bounceOut效果看官网)
// <div @click="btn">点击</div>
// <transition>
//   <!-- 第一步 添加animated类 -->
//     <div class="show animated" v-show="isShow">
//     </div>
// </transition>

  // data(){
  //     return {
  //       isShow : true
  //     }
  //   },
  // methods:{
  //   btn(){
  //     this.isShow = !this.isShow
  //   }
  // }

//   .show{
//   border: 1px solid red;
//   background: red;
//   width: 100px;
//   height: 100px;
// }
// /* .v-enter {
//   opacity: 0;
// } */
// .v-enter-active{
//   animation: bounceIn 1s ease-in
// }
// .v-leave-active{
//   animation: bounceOut 1s ease-in
// }
动画钩子函数
- cnpm install velocity-animate@beta
<transition
  v-on:before-enter="beforeEnter"
  v-on:enter="enter"
  v-on:after-enter="afterEnter"
  v-on:enter-cancelled="enterCancelled"

  v-on:before-leave="beforeLeave"
  v-on:leave="leave"
  v-on:after-leave="afterLeave"
  v-on:leave-cancelled="leaveCancelled"
>
  <!-- ... -->
</transition>
<script>
methods: {
  // --------
  // 进入中
  // --------

  beforeEnter: function (el) {
    // ...
  },
  // 当与 CSS 结合使用时
  // 回调函数 done 是可选的
  enter: function (el, done) {
    // ...
    done()
  },
  afterEnter: function (el) {
    // ...
  },
  enterCancelled: function (el) {
    // ...
  },

  // --------
  // 离开时
  // --------

  beforeLeave: function (el) {
    // ...
  },
  // 当与 CSS 结合使用时
  // 回调函数 done 是可选的
  leave: function (el, done) {
    // ...
    done()
  },
  afterLeave: function (el) {
    // ...
  },
  // leaveCancelled 只用于 v-show 中
  leaveCancelled: function (el) {
    // ...
  }
}
// 这些钩子函数可以结合 CSS transitions/animations 使用,也可以单独使用。
</script>
- 一个使用 Velocity.js 的简单例子:
<!--
Velocity 和 jQuery.animate 的工作方式类似,也是用来实现 JavaScript 动画的一个很棒的选择
-->
<div id="example-4">
  <button @click="show = !show">
    Toggle
  </button>
  <transition
    v-on:before-enter="beforeEnter"
    v-on:enter="enter"
    v-on:leave="leave"
    v-bind:css="false"
  >
    <p v-if="show">
      Demo
    </p>
  </transition>
</div>
<script>
new Vue({
  el: '#example-4',
  data: {
    show: false
  },
  methods: {
    beforeEnter: function (el) {
      el.style.opacity = 0
      el.style.transformOrigin = 'left'
    },
    enter: function (el, done) {
      Velocity(el, { opacity: 1, fontSize: '1.4em' }, { duration: 300 })
      Velocity(el, { fontSize: '1em' }, { complete: done })
    },
    leave: function (el, done) {
      Velocity(el, { translateX: '15px', rotateZ: '50deg' }, { duration: 600 })
      Velocity(el, { rotateZ: '100deg' }, { loop: 2 })
      Velocity(el, {
        rotateZ: '45deg',
        translateY: '30px',
        translateX: '30px',
        opacity: 0
      }, { complete: done })
    }
  }
})
</script>
插槽
- 在html 中不能给标签大写 属性名字必须用驼峰 -
- 组件中间写了 template (有slot='item' 就是具名插槽) 要是直接写的东西对应slot中
<!-- 子组件 -->
  <div>
      B组件
       <!--slot 将父组件的内容查到那个地方  -->
      <slot name='ab'></slot>
      123
  </div>

<!-- 父组件 -->
  <div>
    A组件
    <B>
      <template v-slot:ab>
        <!-- 组件_uid 是组件唯一id -->
        <div title='node'>1号组件</div>
        <div title='react'>2号组件</div>
        <div title='vue'>3号组件</div>
    </template>
    </B>
  </div>
作用域插槽
- 父组件 自定义的插槽可以获取 子组件里面的值
- v-slot: 是定义名字
- v-slot:ab='{v}' =后面的是结构赋值 子组件:v传递过来的值
- slot标签内是不能写内容的 只是一个插槽 但是可以传递给父组件的template template标签内又可以直接获取值
<!-- 父组件 -->
  <div>
    A
    <B>
      <template v-slot:ab='{v}'>
        <!-- 组件_uid 是组件唯一id -->
        <div title='node'>{{v}}</div>
      </template>
    </B>
  </div>
<!-- 子组件 -->

  <div>
    B
      <slot name='ab' :v='inp'></slot>
      123
  </div>
  <script>
      export default {
        data(){
            return {
              inp:1211111111113,
            }
          },
      }
  </script>
vue-cli
  // 全局安装脚手架
  cnpm  i @vue/cli -g
  // 零配置 写测试用
  // 创建 .vue文件直接运行
  // 运行vue serve 文件名字/或者不写
  cnpm i @vue/cli-service-global -g

  // 生成项目
  vue create my-project
webpack配置
- webpack 文件隐藏着
- 配置他 只需要创建vue.config.js 他会覆盖原有配置
let path = require('path')
// 默认环境变量 NODE_ENV production development
module.exports = {
  //根据环境 设置请求路径
  publicPath:process.env.NODE_ENV === 'production' ? 'http://www.zf.com':'/',
  //打包的资源 集中放到一个独立文件
  assetsDir:'asserts',
  // 输出的目录 默认dist
  outputDir:'./my-dist',
  // 加这个才能使用template(一般都是render)  一般不使用体积会变大 设置false
  runtimeCompiler:true,
  // 打包 不在使用SourceMap 减少体积
  productionSourceMap:false,
  chainWebpack:config=>{
    //  可以获取到webpack的配置 在增加一些自己的功能
    //  配置目录别名 别名叫@   以后引用的@ 就直接代表src目录
    config.resolve.alias.set('@',path.resolve(__dirname,'src'))
  },
  // configureWebpack:{//会自动合并
  //   pluhins:[],
  //   module:{}
  // },
  devServer:{
    //开发 服务时 使用
    proxy:{
      '/api/getUser':{
        target:'http://localhost:3000',
        pathRewrite:{
          //vue中 请求 /api/getUser会找到这儿
          //下面配置 /api不会出现在真是请求路径中
          '/api':''
        }
      }
    }
  },
  // vue add style-resources-loader 会自动注入进来
  pluginOptions: {
    'style-resources-loader': {
      preProcessor: 'scss',
      patterns: [
        path.resolve(__dirname,'src/assets/common.scss')
      ]
    }
  }
}
vue-router
- this.$route 放的都是属性
- this.$router 都是方法
- push 跳转路由
- 传参数 params/query
- params 跟在路由/后面 要route文件配置
- query 跟着?后面 无需配置
- replace 跟 router.push 很像,但它不会向 history 添加新记录
- push 跳转路由
<script>
// 配置
 {
  //  动态路径参数 以冒号开头
    path: '/about/:id',
    name: 'about',
    component: () => import(/* webpackChunkName: "about" */ './views/About.vue')
  }
</script>
<!-- 声明式跳转 -->
<script>
// 标签跳转
<router-link to='/about/123'>123</router-link>>
</script>
 <!-- 编程式跳转 -->
 <div @click='btn'>跳转</div>
<script>
  methods:{
      btn(){
        this.$router.push({name:'about',params:{ id: '11123' },query:{plan: 'private' }})
        // 或者
        // this.$router.push({path:'about/12',query:{plan: 'private' }})
      }
    }
</script>

<script>
// about组件
console.log(this.$route.params) // {id:123}
</script>
基本用法
- component:()=>import('xx组件') 懒加载
- router/index.js
  import Vue from 'vue'
  import VueRouter from 'vue-router'
  import routes from './routes'
  // 第三方插件引入后 要使用Vue.use()

  Vue.use(VueRouter);// 注册了两个全局组件 router-link router-view
  // 会在每个组件上定义两个属性 $router $route this.$router this.$route

  export default new VueRouter({
    mode:'hash', //默认会出现一个#
    routes
  })
- router/routes.js
import Home from '_v/Home.vue'
import Profile from '_v/Profile.vue'
import User from '_v/User.vue'
// 默认加载首页 其他的组件 在点击时懒加载
// 可能会有白屏
export default = [
  {
    path:'/home',
    name:'home',
    component:{
      default:Home,
      name:Profile,
      version:User
    }
  },
  {
    path:'/login',
    name:'login',
    // import返回的是一个 promise
    component:()=>import('_v/Login.vue')
    // component 其他的组件 在点击时懒加载
  },
  {
    path:'/profile',
    name:'profile',
    component:()=>import('_v/Profile.vue'),
  },
  {
    path:'/user',
    name:'user',
    component:()=>import('_v/User.vue'),
    meta:{ needLogin:true },//路由元信息
    children:[
      {
        path:'',
        component:()=>import('_v/userAdd.vue'),
      },
      {
        // 儿子路径默认不能j加/
        path:'add',
        name:'userAdd',
        component:()=>import('_v/userAdd.vue'),
      }
    ]
  },
]

//修改配置别名
chainWebpack:config=>{
  config.resolve.alias.set('_v',path.resolve(__dirname,'src/components'))
}
- App.vue
<template>
  <div id='app'>
    <ul>
    <!-- 默认是a标签 tag可以设置  -->
      <li><router-link tag="span" :to="{name:'home'}">首页</router-link></li>
      <li><router-link :to="{path:'/profile'}">个人中心</router-link></li>
      <li><router-link>用户</router-link></li>
      <li><router-link>登录</router-link></li>
    <ul>
    <!--  这个会显示匹配到的路由 -->
    <!-- 没名字 是默认  有名字会根据名字渲染  -->
    <router-view></router-view>
    <router-view name='name'></router-view>
    <router-view name='version'></router-view>

  </div>
</template>
导航守卫-钩子函数
全局的守卫
- router.beforeEach(to,from,next) 当一个导航触发时,全局前置守卫按照创建顺序调用。守卫是异步解析执行,此时导航在所有守卫 resolve 完之前一直处于 等待中。
- router.beforeResolve(to,from,next) 全局解析守卫,同时在所有组件内守卫和异步路由组件被解析之后,解析守卫就被调用。
- router.afterEach(to,from) 这些钩子不会接受 next 函数也不会改变导航本身。
路由独享的守卫
- beforeEnter(to, from, next) 在配置路由里面使用的
组件内的守卫
- beforeRouteEnter (to, from, next)
- 在渲染该组件的对应路由被 confirm 前调用
- 不!能!获取组件实例
this,因为当守卫执行前,组件实例还没被创建 - 但是可以通过next 传递一个vm 他可以访问到 下面两个能获取this 所以next一般没用
- beforeRouteUpdate (to, from, next)
- 在当前路由改变,但是该组件被复用时调用,对于一个带有动态参数的路径 /foo/:id,在 /foo/1 和 /foo/2 之间跳转的时候,
- 可以访问
this
- beforeRouteLeave (to, from, next)
- 导航离开该组件的对应路由时调用
- 可以访问
this - 这个离开守卫通常用来禁止用户在还未保存修改前突然离开。该导航可以通过 next(false) 来取消。
- beforeRouteEnter (to, from, next)
完整的导航解析流程
  /*
  1、导航被触发。
  2、在失活的组件里调用离开守卫。
  3、调用全局的 beforeEach 守卫。
  4、在重用的组件里调用 beforeRouteUpdate 守卫 (2.2+)。
  5、在路由配置里调用 beforeEnter。
  6、解析异步路由组件。
  7、在被激活的组件里调用 beforeRouteEnter。
  8、调用全局的 beforeResolve 守卫 (2.5+)。
  9、导航被确认。
  10、调用全局的 afterEach 钩子。
  11、触发 DOM 更新。
  12、用创建好的实例调用 beforeRouteEnter 守卫中传给 next 的回调函数。
- 钩子函数
- 当组件切换时 会触发离开的钩子 beforeRouteLeave
- 进入到一个新的页面里 组件内部 会触发一个方法 beforeRouteEnter
- 当属性变化的时候 并没有重新加载组件 会触发beforeRouteUpdate
- 钩子周期
- beforeEach 如进入到新的页面
- beforeEnter 进到路由的配置中
- beforeRouterEnter 组件进入时的钩子
- beforeResolve 解析完成
- afterEach 当前进入完毕 -组件渲染完成以后 会调用当前 beforeRouteEnter 回调方法
  <btton @click='toList'>跳转</btton>

  <script>
    1、组件内
      methods:{
        toList(){
          //vue.use(VueRouter)  里面有2个东西 $router $route
          //带r存的都是方法  不带r存的都是属性
          this.$router.push('/user/list')
        }
      }
      //钩子函数  与data同级
      beforeRouteLeave(to,from,next){
        // next()//往下走
      }
      beforeRouteEnter(to,from,next){
        // 此方法中不能拿到this
        // from.name //可以拿到name 对应路由的名字
        next(vm=>{
          console.log('实例',vm)// 组件渲染完成后 会调用当前beforceRouteEnter方法
        })
      }
    2、全局 在main.js里面
      router.beforeEach((to,from,next)=>{
        console.log(to.matched)//获取当前路由所有匹配的路径 是一个数组
        console.log(to.meta)//获取路由元信息
        // 查看路由元 信息 是否有needLogin
        let flag = to.matched.some(match=>{
          return match.meta && match.meta.needLogin
        })

        if(flag){ //需要登录
          let isLogin = localStorage.getItem('login')// ajax 看一下用户是否登录过
          if(isLogin){
            //如果用户已经登录 并且访问 的还是登录页面
            next();
          }else{
            next('/login');//没有登录 去登录页面
          }
        }else{ //不需要登录
          next();
        }

      })
      router.beforeResolve((to,from,next)=>{
        // 当前路由解析后会跳转的钩子
        console.log('xxx')
        next();
      })
      router.afterEach(()=>{
        console.log('xxx')
      })
  </script>
带参数跳转
- 记住参数或查询的改变并不会触发进入/离开的导航守卫(当?后面的值变化的时候)
- 用watch和beforeRouterUpdate的组件内守卫
  1、<!-- 问好传递参数 -->
    <li><router-link to="/user/detail?id=1">用户1</router-link></li>

    <script>
      //获取
      this.$route.query.id

      // 当网页中id值变化的时候 组件不会重新加载
      1、可以用watch监听
        watch:{
          $route(){
            console.log('xx')
          }
        }
      2、beforeRouterUpdate(to,from,next){
          console.log('xx')
          next()
      }
    </script>
  2、<!-- 路由的路径传递 -->
    在routes定义
    {
      path:'detail/id'
    }
    <li><router-link to="/user/detail/1">用户1</router-link></li>

    <script>

      //获取
      this.$route.params.id

    </script>
警告
const router = new VueRouter({
  mode: 'history',
  routes: [
    { path: '*', component: NotFoundComponent }
  ]
})
vuex
- 创建
- store/index.js
  import Vue from 'vue';
  import vuex from 'vuex';

  import actions from './actions'
  import mutations from './mutations'
  import state from './state'
  import getters from './getters'

  import user from './modules/user'

  Vue.use(vuex)
  // 只要页面中注入了store 每个实例上都会存在一个属性 $store
  export default new vuex.Store({
    strict:process.env.NODE_ENV != 'production',// 校验更改状态的合法性
    actions,
    mutations,
    state,
    getters,
    modules:{
      user
    }
  })
  // this.$store.state.lesson
  // this.$store.state.user.userName
- store/state.js && store/getters.js && store/mutations.js && store/actions.js
  // state
  export default {
    lesson:'测试课程',
    className:'1-1'
  }
  // getters
  export default {
    getNewName(state){
      return '高级'+state.lesson
    }
  }
  // mutations 和 store/modules/user.js类似
  export default {

  }
  // actions
  export default {

  }
- store/modules/user.js
export default {
  namespaced: true, //启动 独立的命名空间
  state: {
    userName: 'userName'
  },
  getters: {

  },
  mutations: {
    // 第一个参数永远是state
    change_userName(state,payload) {
      // alert(1)
      state.userName = payload
      console.log(state,payload)
    }
  },
  actions: {
    change_userNameAction({commit},payload){
        setTimeout(()=>{
          commit('change_userName',payload)
          //在action中可以多次触发mutations
        },1000)
    }
  }
}
- 使用
  // 只要页面中注入了store 每个实例上都会存在一个属性 $store
  import {mapState,mapGetters,mapMutations,mapActions} from 'vuex'
  computed:{
    // 默认的
    ...mapState(['lesson','className']),
    // user 是子模块的名字
    ...mapState('user',['userName']),
    //第二个参数是对象 当前直接 获取 u
    // ...mapState('user',{u:(state)=>state.userName})
    ...mapGetters(['getNewName'])
  },
  methods: {
    ...mapMutations('user',['change_userName']),
    ...mapActions('user',['change_userNameAction']),
    btn(){
      this['change_userName']('sg')
      this['change_userNameAction']('sgt')
      // this.$store.commit('user/change_userName','jwt')
      // this.$store.dispatch('user/change_userName','jwt')
    }
  },
axios && jwt 使用
- 搭建server.js
- jwt 原理
- 后端: 用户信息 + 密钥(后端存放) + 过期时间(等) = 组成一个加密的token
- 前端: 登录后获取token,每次发送请求 的时候 将token放在 Authorization 请求头上,后端判断是否有效(过期,正确性等)
let express = require('express')
let app = express()
//jwt jsonwebtoken的库
// jwt.sign 加密 jwt.verify解密
let jwt = require('jsonwebtoken')

var bodyParser = require('body-parser');//解析,用req.body获取post参数
app.use(bodyParser.json());
app.use(bodyParser.urlencoded({extended: false}));

let whitList = ['http://localhost:8080']
app.use((req,res,next)=>{
    let origin = req.headers.origin
     if(whitList.includes(origin)){
        res.setHeader('Access-Control-Allow-Origin',origin)
        res.setHeader('Access-Control-Allow-Headers','name,xx,Authorization,Content-Type')
        res.setHeader('Access-Control-Allow-Methods','PUT')
        res.setHeader('Access-Control-Allow-Credentials',true)
        res.setHeader('Access-Control-Expose-Headers','name,ss,xx')
        res.setHeader('Access-Control-Max-Age',10)
        if(req.method === 'options'){
            res.end()
        }
    }
    next()
})

app.get('/user',(req,res)=>{
  setTimeout(()=>{
    res.json({name:1})
  },2500)
})
const secret = 'cf'
app.post('/login',(req,res)=>{
  let {username} = req.body
  if(username === 'admin'){
    res.json({
      code:0,
      username:'admin',
      //加密 发送给前端
      token:jwt.sign({username:'admin'},secret,{
        expiresIn:5
      })
    })
  }else{
    res.json({
      code:1,
      data:'用户名不存在'
    })
  }
})

app.get('/validate',(req,res)=>{
  let token = req.headers.authorization;
  //解密 获取token
  jwt.verify(token,secret,(err,decode)=>{
    if(err){
      return res.json({
        code:1,
        data:'token失效了'
      })
    }else{
      // 只要用户路由刷新 token就延时 20秒
      res.json({
        username:decode.username,
        code:0,
        token:jwt.sign({username:'admin'},secret,{
          expiresIn:20
        })
      })
    }
  })
})

app.listen(3000,()=>{
    console.log('listen start')
})
- axios封装 和 loading -axiosn封装 api抽离
- libs/ajaxRequest
  import axios from 'axios';
  import store from '../store'
  import {getLocal} from './local'
  // 当第一次请求 显示loding 剩下的时候就不调用了
  // 当都请求完毕后 隐藏loading
  class AjaxRequest{
    constructor(){
      //  请求路径 根据开发和生产区分
      this.baseURL = process.env.NODE_ENV == 'production'?'/':'http://localhost:3000';
      //  超时
      this.timeout = 3000;
      this.queue = {};//存放每次的请求 处理loading
    }
    merge(options){
      return {...options,baseURL:this.baseURL,timeout:this.timeout}
    }
    setInterceptor(instance,url){
      // 每次请求时 都会加一个loading效果
      // 更改请求头
      instance.interceptors.request.use(config=>{
        // 加请求头 getLocal从本地存储获取token
        config.headers.Authorization=getLocal('token');
        if(Object.keys(this.queue).length === 0){
          store.commit('showLoading')
        }
        this.queue[url] = url
        return config
      })
      instance.interceptors.response.use(res=>{
        delete this.queue[url]; // 每次请求成功后 都删除队列里的路径
        if(Object.keys(this.queue).length === 0){
          store.commit('hideLoading')
        }
        return res.data
      })
    }
    request(options){
      // 返回axios实例
      let instance = axios.create(config);
      // 对请求和拦截做处理
      this.setInterceptor(instance,options.url)
      // 将所有的参数合并
      let config = this.merge(options);
      return instance(config)
    }
  }
export default new AjaxRequest
- /api/user
import axios from '../libs/ajaxRequest';

export const getUser = () => {
  return axios.request({
    url:'/user',
    method:'get'
  })
};

export const login = (username) => {
  return axios.request({
    url:'/login',
    method:'post',
    data:{
      username
    }
  })
}

export const validate = () => {
  return axios.request({
    url:'/validate',
    method:'get',
  })
}
- libs/local
export const setLocal = (key,value)=>{
  if(typeof value == 'object'){
    value = JSON.stringify(value);
  }
  localStorage.setItem(key,value)
}

export const getLocal = (key)=>{
 return localStorage.getItem(key)
}
- store
import {login,validate} from '../api/user'
import {setLocal} from '../libs/local'
export default {
  namespaced: true, //启动 独立的命名空间
  state: {
    isShowLoading:false,
    username:'',
  },
  getters: {

  },
  mutations: {
    // 第一个参数永远是state
    showLoading(state){
      state.isShowLoading = true
    },
    hideLoading(state){
      state.isShowLoading = false
    },
    setUser(state,username){
      state.username = username;
    }
  },
  actions: {
    // 登录获取token
    async toLogin({commit},username){
      let rs = await login(username);
      if(rs.code === 0){
        //成功登录
        commit('setUser',rs.username)
        //将token保存到client 每次请求带上, 服务端校验token 如果token不正确 或者过期 没登录
        setLocal('token',rs.token)
      }else{
        return Promise.reject(rs.data)
      }
    },
    //查看 token是否有效
    async validate({commit}){
      let rs = await validate();
      if(rs.code === 0){
        commit('setUser',rs.username)
        setLocal('token',rs.token)
      }
      return rs.code === 0;//返回用户是否失效
    }
  }
}
- router.js
import Vue from 'vue'
import VueRouter from 'vue-router'
import Home from '_v/Home.vue'
import App from './App'

Vue.use(VueRouter);
export default new VueRouter({
  mode:'hash', //默认会出现一个#
  routes:[
    {
      path:'/',
      name:'App',
      component:App
    },
    {
      path:'/login',
      name:'login',
      // import返回的是一个promise
      component:()=>import('_v/Login.vue')
    },
    {
      path:'/profile',
      name:'profile',
      component:()=>import('_v/Profile.vue'),
    },
    {
      path:'/user',
      name:'user',
      component:()=>import('_v/User.vue'),
      meta:{ needLogin:true },//路由元信息
      children:[
        {
          path:'',
          component:()=>import('_v/userAdd.vue'),//$route.matched
        },
        {
          // 儿子路径默认不能j加/
          path:'add',
          name:'userAdd',
          component:()=>import('_v/userAdd.vue'),
        }
      ]
    },
  ]
})
- main
import Vue from 'vue'
import App from './App.vue'

import store from './store/index'
import router from './router'

Vue.config.productionTip = false

router.beforeEach(async (to,from,next)=>{
  // 根据router 配置的meta是否需要登录 在查看是否有效
  let flag = to.matched.some(match=>{
    return match.meta && match.meta.needLogin
  })

  if(flag){ //需要登录
    let rs =  await store.dispatch('validate')//根据rs返回的数据 查看tikon是否有效
    if(rs){
      //如果用户已经登录 并且访问 的还是登录页面
      next();
    }else{
      next('/login');//没有登录 去登录页面
    }
  }else{ //不需要登录
    next();
  }
  next()
})

new Vue({
  render: h => h(App),
  store,
  router
}).$mount('#app')
- app.vue
<span v-if="$store.state.isShowLoading"> 加载中 </span>
<router-view></router-view>
- login.vue
    <input type="text" v-model="username" >
    <Button @click='login'>登录</Button>
    <span>
      当前登录用户:{{$store.state.username}}
    </span>
  <script>
    import {getUser} from '../api/user.js';
    import {mapActions} from 'vuex'

     methods:{
        ...mapActions(['toLogin']),
        login(){
          this['toLogin'](this.username);
        }
      }
  </script>
api
- Vue.extend
- 使用基础 Vue 构造器,创建一个“子类”。参数是一个包含组件选项的对象。
<div id="mount-point"></div>
// 创建构造器
var Profile = Vue.extend({
  template: '<p>{{firstName}} {{lastName}} aka {{alias}}</p>',
  data: function () {
    return {
      firstName: 'Walter',
      lastName: 'White',
      alias: 'Heisenberg'
    }
  }
})
// 创建 Profile 实例,并挂载到一个元素上。
new Profile().$mount('#mount-point')

输入 => <p>Walter White aka Heisenberg</p>
- Vue.mixin
- 全局注册一个混入,影响注册之后所有创建的每个 Vue 实例。(不推荐在应用代码中使用。)
vux原理
- 基本实现
let Vue;
class Store{ // state getters mutations actions
  constructor(options){
    let state = options.state // {count:100}
    this.getters = {}
    this.mutations = {}
    this.actions = {}
    // vue核心就借用了vue的实例 因为vue的实例数据变化 会刷新视图
    this._vm = new Vue({
      data:{
        state
      }
    });
    if(options.getters){
      let getters = options.getters;// {newCount:fn}
      forEach(getters,(getterName,getterFn)=>{
        Object.defineProperty(this.getters,getterName,{
          get:()=>{
            return getterFn(state)
          }
        })
      });
      let mutations = options.mutations
      forEach(mutations,(mutationName,mutationFn)=>{
        // this.mutations.change = ()=>{ change(state) }
        this.mutations[mutationName] = ()=>{
          mutationFn.call(this,state)
        }
      })
      let actions = options.actions
      forEach(actions,(actionName,actionFn)=>{
        // this.mutations.change = ()=>{ change(state) }
        this.actions[actionName] = ()=>{
          actionFn.call(this,this)
        }
      })
    }
    let {commit,dispatch} = this;
    this.commit = (type) => {
      commit.call(this,type)
    }
    this.dispatch = (type) => {
      dispatch.call(this,type)
    }
  }
  get state(){
    return this._vm.state
  }
  commit(type){
    this.mutations[type]()
  }
  dispatch(type){
    this.actions[type]()
  }
}
function forEach(obj,callback){
  Object.keys(obj).forEach(item=>callback(item,obj[item]))
}


let install = (_Vue) =>{
  Vue = _Vue;// 保留vue的构造函数
  // mixin 全局混入 只要组件(main也是组件)生成 beforeCreate就会执行一次
  // beforeCreate  里面的this就是获取当前组件
  Vue.mixin({ //混合
    beforeCreate() {
      // console.log(' beforeCreate 12',this.$options)
      // 我需要把跟组件中 store实例 给每个组件都增加一个$store的属性
      // 是否是跟组件
      if(this.$options && this.$options.store){
        console.log('1',this.$options.store)
        this.$store = this.$options.store
      }else{ // 子组件 store 深度优先 父->子->孙
        console.log('this.$store',this.$options.data)
        this.$store = this.$parent && this.$parent.$store
      }
    },

  })
}
export default {
  Store,
  install
}
- vuex 里面的modules state循环
class ModuleCollection{
  constructor(options){// vuex [a,b]
    this.register([],options);
  };
  register(path,rawModule){
    // path 是个空数组 rawModule就是一个对象
    let newModule = {
      _raw:rawModule,// 对象 当前 有state getters 那个对象
      _children:{}, // 表示 他包含的模块
      state:rawModule.state //他自己模块的状态
    }
    if(path.length == 0){
      this.root = newModule; // 根
    }else{
      let parent = path.slice(0,-1).reduce((root,current)=>{
        return root._children[current];
      },this.root)
      // path[path.length-1] 取数组的最后一项
      parent._children[path[path.length-1]] = newModule
    }
    if(rawModule.modules){ // 有子模块
      forEach(rawModule.modules,(childName,module)=>{
        this.register(path.concat(childName),module)
      })
    }
  }
}

class Store{ // state getters mutations actions
  constructor(options){
    let state = options.state // {count:100}
    this.getters = {}
    this.mutations = {}
    this.actions = {}
    // vue核心就借用了vue的实例 因为vue的实例数据变化 会刷新视图
    this._vm = new Vue({
      data:{
        state
      }
    });

    // 把模块之间的关系 进行整理 自己根据用户传入的参数维护了一个对象
    // root._children => a._children => b
    this.modules = new ModuleCollection(options);
    // 无论是子模块 还是孙子 所有的mutation 都是根上的
    。。。。。。。。。。。。。。。。。。。。。。。
  }
nextTick如何实现
定义了一个 macroTimerFunc(宏任务) microTimerFunc (微任务) 他会先采用微任务要是没有就采用宏任务
宏任务
- 查看是否支持 setImmediate 如果有就将他赋值给macroTimerFunc(宏任务)执行回调
- 没有的话 查看是否支持 messageChannel 有就用将他赋值给macroTimerFunc(宏任务)执行回调
- 若上面 上面两个都不支持 直接将setTimeout(callback,0) 赋值给macroTimerFunc(宏任务)执行
微任务
- 查看知否支持promise 支持就 new promise 将实例.then赋值给微任务执行
- 要是不支持 就暴力的说 microTimerFunc = macroTimerFunc
日期组件
- /components/DatePicker.vue
<template>
<div v-click-outside>
<input type="text" :value="formatDate" >
<div class="pannel" v-if="isVisible">
<div class="pannel-nav">
<span><</span>
<span @click='prevMonth'><<</span>
<span>{{time.year}}年</span>
<span>{{time.month}}月</span>
<span @click='nextMont'>>></span>
<span>></span>
</div>
<div class="pannel-content">
<div class='days'>
<span
v-for="j in 7" :key='`_i`+j'
class="cell"
>
{{weekDays[j-1]}}
</span>
<!-- 直接列出一个 6 * 7 一个列表 -->
<!-- 判断是不是当月 不是当月就变灰色 -->
<div v-for='i in 6' :key="'_a'+i">
<span
class="cell"
:class="[
{notCuurentMonth:!isCurrentMoth(visibeDays[(i-1)*7+(j-1)])},
{today:isToday(visibeDays[(i-1)*7+(j-1)])},
{select:isSelect(visibeDays[(i-1)*7+(j-1)])}
]"
v-for="j in 7"
:key="'_b'+j"
@click="chooseDate(visibeDays[(i-1)*7+(j-1)])"
>
{{visibeDays[(i-1)*7+(j-1)].getDate()}}
</span>
</div>
</div>
</div>
<div class="pannel-footer">
今天
</div>
</div>
</div>
</template>
<script>
import {getYearMonthDay,getDate} from '../utils'
export default {
directives:{
clickOutside:{//指令的生命周期
bind(el,bindings,vnode){
// 把事件绑定给document上 看一下点击的是否是当前这个元素
let handler = (e)=>{
if(el.contains(e.target)){
// 判断一下是否当前面板已经显示出来了
if(!vnode.context.isVisible){
vnode.context.focus()
console.log('包含')
}
}else{
if(vnode.context.isVisible){
vnode.context.blur()
console.log('不包含')
}
}
}
el.handler = handler
document.addEventListener('click',handler)
console.log(el,bindings,vnode)
},
unbind(){
document.removeEventListener('click')
}
}
},
data(){
let {year,month} = getYearMonthDay(this.value)
month = month+1
return{
weekDays:['日','一','二','三','四','五','六',],
time:{year,month},
isVisible:true,//这个变量是用来控制这个面板是否可见
}
},
props:{
value:{
type:Date,
default:()=>new Date()
}
},
methods:{
focus(){
this.isVisible = true
},
blur(){
this.isVisible = false
},
isCurrentMoth(date){
// 他是不是当月 比较this.value和date 年月是否相等
let {year,month} = getYearMonthDay(getDate(this.time.year,this.time.month,1));
let {year:y,month:m} = getYearMonthDay(date)
return year === y && month === m
},
isToday(date){
let {year,month,day} = getYearMonthDay(new Date());
let {year:y,month:m,day:d} = getYearMonthDay(date);
return year === y && month === m && day === d
},
chooseDate(date){
this.time = getYearMonthDay(date);
this.$emit('input',date)
this.blur()
},
isSelect(date){
let {year,month,day} = getYearMonthDay(getDate(this.time.year,this.time.month,1));
let {year:y,month:m,day:d} = getYearMonthDay(date);
return year === y && month === m && day === d
},
prevMonth(){
let d = getDate(this.time.year,this.time.month,1)
d.setMonth(d.getMonth()-1)
this.time = getYearMonthDay(d)
},
nextMont(){
let d = getDate(this.time.year,this.time.month,1)
d.setMonth(d.getMonth()+1)
this.time = getYearMonthDay(d)
}
},
computed: {
visibeDays(){
// 先获取当前是周几
let {year,month,day} = getYearMonthDay(getDate(this.time.year,this.time.month,1))
// 获取当前月份的第一天
let currentFirstDay = getDate(year,month,1)
// 生成一个 当前 2019 5 18
// 获取当前是周几 把天数往前移动 几天
let week = currentFirstDay.getDay();
// 当前开始的天数, 日期格式 和 和 数字相减得到一个毫秒戳
let startDay = currentFirstDay - week * 60 * 60 * 1000 * 24
// 循环42天
let arr = []
for(let i=0;i<42;i++){
// 依次循环出42天
arr.push(new Date(startDay+i * 60 * 60 * 1000 * 24))
}
return arr
},
formatDate(){
let {year,month,day} = getYearMonthDay(this.value)
console.log(year,month,day)
this.visibeDays
// getFullYear getMonth getDate
return `${year}-${month}-${day}`
}
},
}
</script>
<style lang='scss'>
.pannel{
position: absolute;
background: #fff;
box-shadow: 2px 2px 2px pink, -2px -2px 2px pink;
.pannel-nav{
height: 30px;
display: flex;
justify-content: space-around;
span {
cursor: pointer;
user-select: none;
}
}
.pannel-content{
box-sizing: border-box;
.cell{
display: inline-block;
justify-content: center;
align-items: center;
width:50px;
height: 50px;
font-weight: bold;
text-align: center;
border: 2px solid #fff;
box-sizing: border-box;
}
.cell:hover{
border: 1px solid pink;
background: pink;
}
.notCuurentMonth{
color:gray
}
.today{
color: #fff;
background: red;
border-radius: 4px;
}
.select{
color: #fff;
background: red;
border-radius: 4px;
}
}
.pannel-footer{
height: 30px;
text-align: center
}
}
</style>
- utils
const getYearMonthDay = (date) => {
    let year = date.getFullYear()
    let month = date.getMonth()+1
    let day = date.getDate()
    return {year,month,day}
}
const getDate = (year,month,day)=>{
  return new Date(year,month-1,day)
}
export {
  getYearMonthDay,
  getDate
}
- 用法
<DatePicker v-model="now"></DatePicker>
<script>
import DatePicker from './components/DatePicker';
export default {
  data(){
    return{
      now : new Date()
    }
  },
  components:{
    DatePicker
  }
}
</script>
插件的编写&&mixin用法
- 每个插件 内部需要提供一个install方法
- 使用 Vue.use('插件')
- mixin 混合
- vue.mixin 组件原有的方法会和他混合
- 将实例化的info 对象传递给所有组件
- 通过beforeCreate方法
- 判断this.$options里面传递的参数 一个个传入进去 (递归)
- 这个写了 在每个组件获取info 对象,跟vuex效果等一样实现
- Message组件 2中方法引入(模仿element-ui)
import Message from './components/Message'
let info = {a:1,b:2}
Vue.use(Message)
new Vue({
  router,
  store,
  info,
  // template:`<div>123</div>`,
  render: h => h(App)
}).$mount('#app')
- Message.js
import Vue from 'vue';
import MessageComponent from './Message.vue'
// 获取当前组件的实例
let getInstance = ()=>{
  let vm = new Vue({
    render:h=>h(MessageComponent)
  }).$mount(''); //会在内存中进行挂载
  document.body.appendChild(vm.$el);

  // 获取他的儿子,就一个儿子
  let component = vm.$children[0]
  return {
    add(options){
      component.add(options)
    }
  }
  // vm
}
// 单例模式
let instance;
let getInst = ()=>{ //返回一个唯一的实例
  instance = instance || getInstance()
  return instance
}
const Message = {
  info(options){
    getInst().add(options)
  },
  warn(){

  },
  success(){

  },
  error(){

  }
}
export {
  Message
}
let _Vue;
export default{
  install(Vue,options){
    // options 代表的是use的第二个参数
    if(!_Vue){
      // 防止用户多次use
      _Vue = Vue
      let $message = {}
      Object.keys(Message).forEach(type=>{
        $message[type] = Message[type];
      })
      Vue.prototype.$message = $message
    }
    Vue.mixin({
      beforeCreate() {//所有组件都增加了这个方法
        if(this.$options.info){
          this._info = this.$options.info
        }else{
          this._info = this.$parent && this.$parent._info
        }
      },
    })
  }
}
- Message.vue
<template>
  <div class='message' v-if="messages.length">
    <div v-for='m in messages' :key="m.id">
      {{m.message}}
    </div>
  </div>
</template>

<script>
export default {
  data(){
    return{messages:[]}
  },
  mounted(){
    this.id = 0;//表示当前弹层的唯一标识
  },
  methods:{
    add(options){
        let id = this.id ++
        let layer = {...options,id}
        this.messages.push(layer)
        layer.timer = setTimeout(()=>{
           this.remove(layer)
        },options.duration)
    },
    remove(layer){
      this.messages = this.messages.filter(message=>message.id !== layer.id
      )
    }
  }
}
</script>
<style>

</style>
- 用法
- App.vue
<template>
  <div id="app">
    <button @click='btn'>点击弹框</button>
  </div>
</template>
<script>
import {Message} from './components/Message'
export default {
  mounted() {
    console.log(this._info)
  },
  methods: {
    btn(){
      // Message.info({
      //   message:'我很帅',
      //   duration:3000
      // })
      this.$message.info({
        message:'我很帅',
        duration:3000
      })
    }
  },
}
</script>
mvvm
观察者模式
1、被观察者供维护观察者的一系列方法
2、观察者提供更新接口
3、观察者把自己注册到被观察者里
4、在被观察者发生变化时候,调用观察者的更新方法
- 特点
- 只有观察者和被观察者 2个
- 被观察者和观察者是耦合的 => 所有的观察者都放到被观察者内
- 观察者提供一个更新的方法,由被观察者调用
- 使用场景
- 1、promise then的时候,里面的函数 用一个列表保存起来 等待resolve执行完成 执行列表里面的每一个函数,这样then就能拿到结构
- 2、node evnets对象 里面 on 和 emit
- 3、vue和react里面的声明 周期 只有等待运行这一步的时候(事件触发的时候) 才会取调用
发布订阅
1、有发布者  调度中心 订阅者
2、订阅者把自己想订阅的事件 注册到调度中心
3、当该事件触发的时候,发布者发布该事件到调度中心,由调度中心统一调度订阅者注册到调度中心的代码处理
特点:解耦
模拟代码
class Agent{
  constructor(){
    this._events = {}
  }
  // on
  subscribe(type,listener){
    let listeners = this._events[type]
    if(listeners){
      listeners.push(listener)
    }else{
      this._events[type] = [listener]
    }
  }
  // emit
  publish(type){
    let listeners = this._events[type]
    let args = Array.prototype.slice.call(arguments,1)
    if(listeners){
      listeners.forEach(listener=>listener(...args))
    }
  }
}
// 房东
class LandLord{
  constructor(name){
    this.name = name
  }
  // 向外出租
  lend(agent,area,money){
    agent.publish('house',area,money)
  }
}
// 租客
class Tenant{
  constructor(name){
    this.name = name
  }
  rent(agent){
    agent.subscribe('house',(area,money)=>{
      console.log(`${this.name}看到中介的新房源${area},${money}`)
    })
  }
}

let agent = new Agent();
let t1 = new Tenant('张三');
let t2 = new Tenant('李四');
t1.rent (agent)
t2.rent (agent)
let landLord = new LandLord();
landLord.lend(agent,60,400)
观察者模式 和 发布订阅 区别
- 1、观察者模式的订阅者与发布者之间是存在依赖的,而发布/订阅模式则不会。
- 2、角色量不一样
mvvm 代码
// 观察者(发布订阅)

class Dep{
  constructor(){
    this.subs = [] //存放所有的watcher
  };
  // 订阅
  addSub(watcher){
    // 添加 watcher
    this.subs.push(watcher)
  }
  // 发布
  notify(){
    console.log('this.subs',this.subs)
    this.subs.forEach(watcher => watcher.update())
  }
}

class Watcher{
  constructor(vm,expr,cb){
    this.vm = vm;
    this.expr = expr;
    this.cb = cb;
    // 默认存放一个老值
    this.oldValue = this.get();
  }

  get(){
    Dep.target = this;//先把自己放在this上
    // 取值 把这个观察者 和 数据关联起来
    let value = CompileUtil.getVal(this.vm,this.expr);
    console.log('this.subs11111',this.subs)
    Dep.target = null;
    return value
  }

  update(){
    //更新操作 数据变化后 会调用观察者的update方法
    let newVal = CompileUtil.getVal(this.vm,this.expr);
    if(newVal !== this.oldValue){
      this.cb(newVal)
    }
  }
}

class Observer{ // 实现数据劫持
  constructor(data){
    this.observer(data);
  }

  observer(data){
    // 如果是对象才观察
    if(data && typeof data == 'object'){
      //如果是对象
      for(let key in data){
        this.defineReactive(data,key,data[key]);
      }
    }
  }

  defineReactive(obj,key,value){
    this.observer(value);
    let dep = new Dep();//给每个属性 都加上一个具有发布订阅的功能
    Object.defineProperty(obj,key,{
      get(){
        //创建watcher时候 会去对应的内容 并且把watcher 放到全局上
        Dep.targer && dep.subs.push(Dep.target)
        return value;
      },
      set:(newVal) => {
        console.log('==',newVal)
        if(newVal != value){
          this.observer(newVal)
          value = newVal
          dep.notify();
        }
      }
    })
  }
}

class Compiler{
  constructor(el,vm){
    // 判断el 属性 是不是一个元素
    this.el = this.isElementNode(el)?el:document.querySelector(el)
    this.vm = vm
    //把当前节点中的元素 获取到 放到内存中
    let fragment = this.node2fragment(this.el);

    //把节点中的内容进行替换

    //编译模板 用数据编译
    this.compile(fragment)

    //把内容塞到页面中
    this.el.appendChild(fragment)
  }

  isDirective(attrName){
    // startsWith() 方法用于检测字符串是否以指定的前缀开始。
    return attrName.startsWith('v-')
  }

  // 编译元素的
  compileElement(node){
    //获取元素属性
    let attributes = node.attributes;// 类数组
    // type='text' v-model='school.name'
    // console.log('==',{...attributes});
      //name就是v-model value 就是school.name
    [...attributes].forEach(attr => {
      let {name,value:expr} = attr;//
      //判断是不是指令
      if(this.isDirective(name)){
        let [,directive] = name.split('-');

        //需要调用不同的指令 来处理
        // node 当前的节点  expr是指令里面的名字  this.vm是当前传递进来的vue参数
        CompileUtil[directive](node,expr,this.vm);
        // console.log('========',node,expr,this.vm)
      }
    })

  }
  // 编译文本的
  compileText(node){
    let content = node.textContent;
    // 判断当前文件节点中的内容是否包含 {{}}
    if(/\{\{(.+?)\}\}/.test(content)){
      // console.log(content,' 找到所有文本',node)//找到所有文本
      CompileUtil['text'](node,content,this.vm);
    }
  }
  // 核心的编译方法
  compile(node){// 用来编译内存中的dom节点
    let childNodes = node.childNodes;
    [...childNodes].forEach(child=>{
      if(this.isElementNode(child)){
        // 进来的都是元素节点
        this.compileElement(child)
        // 如果是元素的话 需要把自己传递进去 在去便利子元素
        this.compile(child)
      }else{
        this.compileText(child)
      }
    })
  }

  isElementNode(node){//判断是不是文本节点
    return node.nodeType === 1
  }
  //把节点移动到内存中
  node2fragment(node){
    //创建一个文件碎片
    let fragment = document.createDocumentFragment();
    let firstChild;
    while(firstChild = node.firstChild){
      //appendChild增加一个原来的就少一个
      fragment.appendChild(firstChild)
    }
    return fragment
  }
}

CompileUtil = {
  // 根据表达式取到对应的数据
  getVal(vm,expr){//expr格式=> vm.$data  'scholl.name'
   let arr = expr.split('.')
   let rs = vm.$data
   arr.forEach(item=>{
      rs =  rs[item]
   })
   return rs
  },
  model(node,expr,vm){
    // node节点 expr是表达式 vm是当前实例
    // 给输入框赋予value属性
    let fn = this.updater['modelUpdater']

    new Watcher(vm,expr,(newVal)=>{
      // 给输入框加入一个观察着
      // 如果稍后数据更新了会触发此方法,会拿新值 给输入框赋予值
      fn(node,newVal);
    })

    let value = this.getVal(vm,expr)
    fn(node,value)
  },
  html(){
    //
  },
  getContentValue(vm,expr){
    //遍历表达式 将内容 重新替换成一个完整的内容 返还回去
    return expr.replace(/\{\{(.+?)\}\}/g,(...args)=>{
      return this.getVal(vm,rgs[1])
    })
  },
  text(node,expr,vm){
      let fn = this.updater['textUpdater']
      // expr => {{xx}}
      let content = expr.replace(/\{\{(.+?)\}\}/g,(...args)=>{
        new Watcher(vm,args[1],()=>{
          // 给表达式每{{}}都加上观察者
          fn(node,this.getContentValue(vm,expr));//返回了一个全的字符串
        })
        return this.getVal(vm,args[1])
      })
      fn(node,content)
  },
  updater:{
    // 把数据插入到节点中
    modelUpdater(node,value){
      node.value = value
    },
    htmlUpdater(){

    },
    //处理文本节点
    textUpdater(node,value){
      node.textContent = value
    }
  }
}

class Vue{
  constructor(options) {
    this.$el = options.el;
    this.$data = options.data;
    //这个根元素 存在 编译模板
    if(this.$el){

      //把数据 全部转换成 object.defineProperty来定义
      new Observer(this.$data)
      new Compiler(this.$el,this)
    }
  }
}
vuex存储和本地存储(localstorage、sessionstorage)的区别
1.最重要的区别:vuex存储在内存,localstorage则以文件的方式存储在本地
2.应用场景:vuex用于组件之间的传值,localstorage则主要用于不同页面之间的传值。
3.永久性:当刷新页面时vuex存储的值会丢失,localstorage不会。
注:很多同学觉得用localstorage可以代替vuex, 对于不变的数据确实可以,但是当两个组件共用一个数据源(对象或数组)时,如果其中一个组件改变了该数据源,希望另一个组件响应该变化时,localstorage无法做到,原因就是区别1。